Retaining walls are functional and aesthetic structures that add value to landscapes while preventing soil erosion and managing sloped terrains. Whether you’re enhancing your backyard, preventing landslides, or creating additional usable space, understanding how to install a retaining wall is essential. This guide will cover everything you need to know—from planning and materials to construction and maintenance.
1. What Is a Retaining Wall?
A retaining wall is a structure designed to hold back soil, providing support for vertical or near-vertical grade changes. Commonly used in landscaping and engineering projects, retaining walls serve both practical and decorative purposes.
Key Benefits of Retaining Walls:
Prevent soil erosion.
Manage water runoff.
Create usable outdoor spaces on sloped terrains.
Enhance aesthetic appeal.
2. Types of Retaining Walls
Understanding the various types of retaining walls will help you choose the right one for your project.
a. Gravity Walls
Relies on its weight to resist soil pressure.
Constructed using heavy materials like concrete, stone, or brick.
b. Cantilevered Walls
Designed with reinforced concrete or masonry.
Uses a foundation slab and vertical stem for stability.
c. Anchored Walls
Supported by cables or anchors drilled into the ground.
Ideal for taller walls or projects with high soil pressure.
d. Segmental Retaining Walls (SRW)
Made from interlocking blocks, offering flexibility and durability.
Perfect for DIY projects.
e. Sheet Pile Walls
Constructed with steel, wood, or vinyl sheets.
Common in waterfront or tight-space applications.
. Tools and Materials Required
Before starting your project, gather the necessary tools and materials to ensure a smooth process.
Tools:
Shovel and pickaxe
Level and measuring tape
Tamper or plate compactor
Circular saw (for cutting materials)
Wheelbarrow
Safety gear (gloves, goggles, etc.)
Materials:
Retaining wall blocks, stones, or concrete
Gravel or crushed stone (for base and backfill)
Drainage pipes
Landscape fabric
Adhesive or mortar (if required)
4. Planning Your Retaining Wall
Proper planning is crucial for a durable and effective retaining wall.
a. Determine the Purpose
Is the wall for erosion control, aesthetic purposes, or leveling a yard?
Define its function to choose the appropriate design and materials.
b. Measure the Area
Mark the area where the wall will be built.
Calculate the height, length, and width of the wall to estimate materials.
c. Check Local Regulations
Obtain necessary permits if the wall exceeds a certain height (often 3-4 feet).
Ensure compliance with zoning laws and property lines.
d. Consider Drainage Needs
Proper drainage prevents water buildup, which can weaken the wall. Plan for gravel backfill and drainage pipes to direct water away.
5. Step-by-Step Guide to Retaining Wall Installation
Step 1: Prepare the Site
Clear the Area: Remove vegetation, debris, and obstructions.
Excavate the Base: Dig a trench 6-12 inches deep and slightly wider than the wall.
Step 2: Lay the Base
Add Gravel: Fill the trench with 4-6 inches of gravel or crushed stone.
Compact the Base: Use a tamper or plate compactor to create a level and firm base.
Step 3: Place the First Layer
Start with Cornerstones: Place the first layer of blocks or stones in the trench, ensuring they’re level.
Check Alignment: Use a level to align blocks horizontally and vertically.
Step 4: Build the Wall
Stack Blocks or Stones: Lay subsequent layers, staggering joints for stability.
Backfill Gradually: Add gravel behind each layer, compacting it for drainage and support.
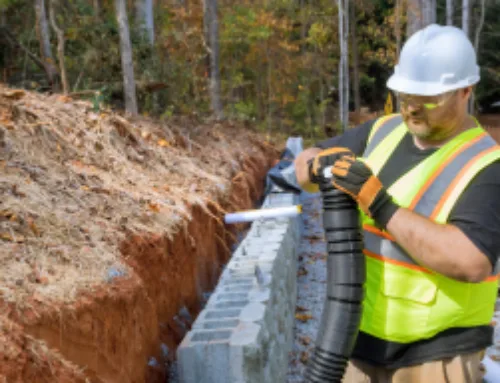
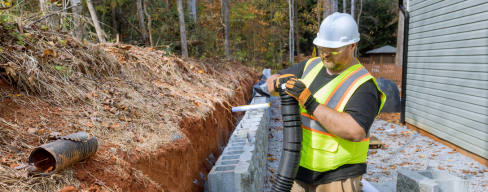
Install Drainage Pipes: Place perforated pipes behind the wall to prevent water buildup.
Step 5: Cap the Wall
Add Capstones: Use adhesive or mortar to secure the top layer for a finished look.
Trim Excess Fabric: Cut any visible landscape fabric for a clean appearance.
Step 6: Final Touches
Grade the Area: Ensure the ground slopes slightly away from the wall.
Plant Vegetation: Add plants or grass to stabilize the soil around the wall.
6. Common Mistakes to Avoid
a. Skipping Drainage
Poor drainage can lead to wall failure due to water pressure buildup.
b. Ignoring Soil Type
Different soils (clay, sandy, loamy) affect wall stability and require specific considerations.
c. Not Leveling the Base
An uneven base leads to structural instability and uneven walls.
d. Overbuilding Without Support
Tall walls require reinforcements like geogrid or anchors.
e. Neglecting Local Regulations
Ignoring permits and zoning laws can lead to legal issues or costly modifications.
7. Maintenance Tips for Retaining Walls
Regular maintenance extends the lifespan of your retaining wall and prevents costly repairs.
Inspect Regularly: Check for cracks, bulges, or shifts in the wall.
Clean the Wall: Remove debris, dirt, and vegetation to maintain aesthetics and function.
Monitor Drainage: Ensure drainage pipes are unclogged and functioning.
Reinforce When Necessary: Address minor issues promptly to prevent major damage.
8. Cost of Retaining Wall Installation
The cost of building a retaining wall varies based on materials, size, and labor.
Average Costs by Material:
Concrete: $20-$40 per square foot
Stone: $25-$75 per square foot
Timber: $15-$25 per square foot
Interlocking Blocks: $15-$30 per square foot
DIY vs. Professional Installation:
DIY: More affordable but requires time, tools, and expertise.
Professional: Offers reliability and efficiency but at a higher cost.
9. Environmental Considerations
Sustainability is increasingly important in construction projects. Consider eco-friendly options:
Use locally sourced, recycled, or renewable materials.
Incorporate vegetation to blend the wall into the natural landscape.
Avoid chemicals that may leach into the soil.
10. Retaining Wall Design Ideas
Retaining walls can be both functional and visually stunning.
Terraced Gardens: Create multiple levels for planting flowers or vegetables.
Water Features: Integrate a waterfall or fountain for added elegance.
Outdoor Seating: Use the wall as a bench for entertaining areas.
Lighting: Add LED lights for safety and ambiance.
Conclusion
Retaining wall installation is a rewarding project that combines functionality and aesthetics. By following the steps outlined in this guide, you can create a durable, attractive wall that enhances your landscape. Whether you’re a DIY enthusiast or hiring a professional, proper planning, construction, and maintenance are key to a successful project.
Contact us right now.
Professional swimming pool installation and remodeling in Metro Atlanta.
Contact us
© All rights reserved by Avatar Scapes since 2012 | Sitemap