I’ve spent the last decade and a half installing pool coping on residential and commercial projects across multiple states. When homeowners ask me if they can tackle this project themselves, my answer is always the same: absolutely, if you follow the right approach and give the work your full attention. I’ve personally witnessed countless DIY pool owners successfully complete this project, and I want to walk you through exactly what I’ve learned from my experience in the field.
Installing pool coping isn’t just about creating a finished edge. It’s about protecting your entire pool investment while creating something that looks professionally done. Your pool’s coping serves as a protective barrier, prevents water damage to your pool structure, and honestly, it’s what separates an average backyard pool from one that looks like you hired a professional.
Understanding Pool Coping and Why It Matters
What is Pool Coping?
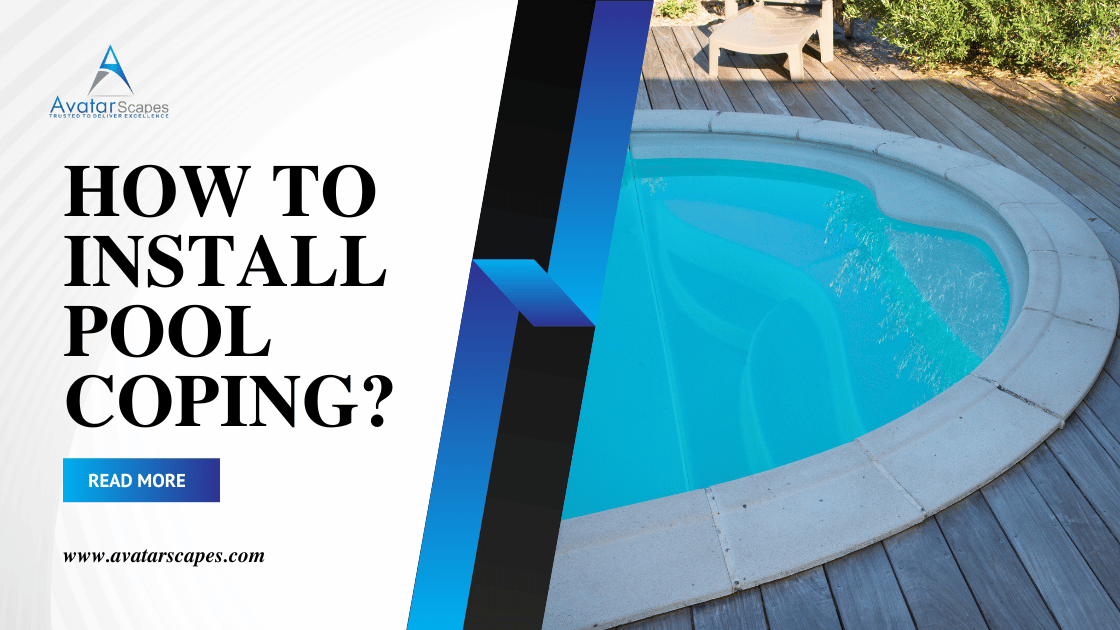
Pool coping is the edging material that caps the top of your pool wall. It’s literally the border between your pool water and your surrounding deck area. Think of it as the protective border that keeps your pool structure safe from the elements and from constant water exposure.
From my personal experience on job sites, I’ve worked with several different coping materials, and each has distinct characteristics. Concrete coping offers durability and affordability. I’ve installed this type on numerous projects because it holds up well over time. Stone coping delivers that premium, elegant appearance that clients specifically request. Pavers provide flexibility in design options. Bullnose tiles create a sleek, polished finish that catches the light beautifully.
The Benefits of Quality Coping Installation
Why does proper coping installation matter so much? Well, good coping prevents water from seeping into the pool wall structure and causing costly damage. I’ve personally seen pools where improper coping led to water intrusion and thousands of dollars in repairs. Quality coping also protects your pool’s shell from UV damage, freeze-thaw cycles, and general weathering.
Beyond the functional benefits, proper coping adds that polished, resort-like quality to your backyard. It completely transforms how your pool looks. When you walk around a pool with well-installed coping, you immediately feel like you’re in a professional space. That attention to detail adds measurable value to your property.
Gathering Your Materials and Tools
Essential Materials You’ll Need
Before you start this project, you need the right materials. From my experience, getting quality materials from the start saves you headaches later.
Obviously, you need your coping material itself. Whether it’s stone, concrete, pavers, or tile, calculate your pool’s perimeter and then add an extra ten percent to your order. I always recommend this because cut mistakes happen, and you don’t want to find yourself unable to complete the project.
Next, you need pool coping adhesive or thin-set mortar specifically designed for wet environments. I’ve made this mistake early in my career by using regular mortar, and it failed within months. That experience taught me that pool-grade adhesive is absolutely essential. This adhesive bonds your coping to the pool wall and must withstand constant moisture exposure.
You’ll need pool-grade grout for filling the spaces between coping pieces. I’ve tested various grout products over the years, and pool-grade grout is the only option that doesn’t deteriorate when exposed to chlorinated water and moisture. Get yourself pool coping sealant as well. I recommend applying this after installation. It protects your coping from staining, mold, UV damage, and extends the life of your installation significantly.
Tools Required for the Job
Based on my experience completing dozens of these installations, here’s what you actually need in your toolkit.
A wet saw is essential if you’re working with stone or concrete coping. I’ve tried using regular cutting tools, and they simply won’t produce the clean edges you need for professional results. This tool is worth renting if you don’t already own one.
Get yourself a notched trowel for spreading adhesive. The ridges on this trowel create the proper thickness needed for good adhesion. A rubber float spreads grout effectively, and a grout sponge handles cleanup. You’ll need a quality tape measure, a level for ensuring everything is straight, and a chalk line for marking your installation path.
Don’t skip safety gear. Work gloves, safety glasses, and a dust mask are non-negotiable. I’ve spent years on job sites, and I’ve learned that protecting yourself from dust and debris is essential for your health.
A grinder with a masonry blade helps you fine-tune cuts and fit pieces together perfectly. An oscillating sander smooths out rough edges. Have caulk and a caulking gun available for any final sealing touches.
Preparing Your Pool for Coping Installation
Assessing Your Current Pool Structure
Before installing a single piece of coping, honestly assess what you’re working with. I’ve arrived at job sites where the pool wall had bumps, cracks, and significant irregularities. An uneven wall makes coping installation exponentially harder and produces poor results.
Walk around your entire pool carefully. Look for any damage, visible cracks, or spots where water might be penetrating the pool wall. These issues need fixing before you add coping. I always recommend taking photographs of any problem areas so you can research solutions or consult with a professional if needed.
Check the pool wall material. I’ve worked with concrete, fiberglass, and vinyl pool walls, and each behaves differently. Each surface requires slightly different preparation approaches. Make sure you know exactly what material you’re dealing with before starting your installation.
Cleaning and Measuring Your Pool Edge
This preparation step feels tedious, but skipping it causes problems. Clean your pool edge thoroughly. Remove algae, dirt, loose debris, and old caulking. I use a pressure washer at low pressure settings to clean the edge carefully. You’re creating a clean surface where the adhesive can bond properly.
Now comes the critical measuring step. Measure your pool’s perimeter multiple times. I measure clockwise, then counterclockwise, then compare my numbers. Using a chalk line, mark where your coping will sit on the pool wall. Walk around with your level and verify that your line is perfectly level all the way around. Any slopes or dips in your marking line will show up as visible problems in your finished coping.
Step-by-Step Installation Process
Setting Up Your Work Space
Organization makes this entire project significantly easier. Set up your workspace in sections. I work on one side of the pool, complete it, and then move to the next side. Lay out all your materials and tools within arm’s reach before you start.
Prepare your adhesive according to manufacturer instructions before you place any coping pieces. Having everything ready to go prevents delays and keeps you in a productive rhythm.
Start at a corner because corners allow you to hide slight imperfections if needed. Corners also help you establish a pattern and rhythm for the work ahead.
Installing the First Section
This is where your careful preparation pays off. Apply your pool-grade adhesive to the top of your pool wall using your notched trowel. I aim for consistent thickness of approximately a quarter inch. From my experience, skimping on adhesive is a mistake that leads to future problems like movement and water intrusion.
Place your first coping piece firmly into the adhesive. Press it down with a slight twisting motion to set it properly. Use your level to ensure it’s straight and at the proper height relative to your water line. From my installations, coping should sit approximately 6 to 12 inches above the water level, depending on your specific pool design.
Let each piece settle for a minute before adding the next one. Patience here prevents shifting and ensures proper adhesion. If you’re using heavy stone coping, consider using coping clamps to hold pieces in place while the adhesive cures. I’ve used these on larger installations and they provide excellent support.
Creating Consistent Joints and Seams
The gaps between coping pieces need to be consistent throughout your installation. I use spacers to maintain even gaps, typically between a quarter inch and a half inch. These spacers ensure your finished installation looks intentional and professional rather than haphazard.
When you need to cut pieces to fit corners or edges, take your time with this step. I’ve made rushed cuts that wasted expensive material. Mark your cut lines clearly with chalk before using the wet saw. Make smooth, controlled cuts to avoid chipping or cracking the material. Let the saw do the work rather than forcing the cut.
Grouting and Sealing
Once your adhesive cures completely, consult the manufacturer’s instructions for timing. Usually this takes 24 to 48 hours. Then it’s time for grouting.
Mix your pool-grade grout to a consistency similar to peanut butter. You want it thick enough to stay in the joints but spreadable enough to work with. Use your rubber float to work grout into the joints at approximately a 45-degree angle. Push the grout deep into the seams.
After filling all joints, let the grout set for the recommended time before cleaning. Then use a damp grout sponge to clean excess grout from the coping surface. This takes patience and multiple passes. I typically go over the same area several times with gradually increasing pressure to get it clean. Proper cleanup at this stage determines your final appearance.
Once everything cures completely, which typically takes 48 to 72 hours, apply your pool coping sealant. Follow the product instructions carefully. Some sealants require multiple coats spaced several hours apart. This sealing step protects your entire investment and keeps your coping looking fresh for years.
Common Mistakes to Avoid
Rushing the Process
The biggest mistake I see people make is hurrying through this project. They want to see the finished product, so they skip recommended cure times or don’t allow adhesive to fully set before applying grout. This leads to pieces shifting, cracking, and grouting failures down the road. From my experience, trusting the process and giving everything proper cure time is essential. Your pool isn’t going anywhere. It will still be there tomorrow. Give materials the time they need to cure properly.
Improper Measurements and Cuts
Sloppy measuring creates visible gaps and inconsistent spacing that look unprofessional. Improper cuts mean pieces don’t fit together well. I’ve seen final results that clearly showed a rush job because of measurement mistakes. Take measurements seriously. Mark everything clearly. If you’re new to working with pool coping materials, practice your cuts on scrap material first.
Maintenance Tips for Long-Lasting Coping
Regular Cleaning Routines
Your finished coping needs regular attention to maintain its appearance. I brush my coping monthly to prevent algae buildup. I clean it with pool-safe cleaner quarterly. I never use harsh chemicals that damage the sealant I worked so hard to apply.
Seasonal Care and Inspection
Before winter arrives, inspect your coping carefully for any damage or issues. Check grout joints for cracks. Look for areas where water might be seeping behind the coping. Catching problems early prevents expensive repairs later. In spring, inspect again and reseal if needed. From my experience, staying ahead of maintenance prevents the majority of coping problems.
Pool Coping Installation Services in North Georgia
Avatar Scapes has been the trusted choice for pool coping installation in North Georgia since 2013. Over the past decade, we’ve built our reputation on delivering professional-quality coping installations that protect pool investments and create beautiful outdoor spaces. Our team brings hands-on expertise to every project, working with homeowners who want their pools to look and function flawlessly. We understand North Georgia’s unique climate challenges, from humidity and freeze-thaw cycles to intense summer heat. These environmental factors directly impact how pool coping performs over time. At Avatar Scapes, we select materials and installation techniques specifically suited to withstand North Georgia’s weather patterns. Whether you’re working on a residential backyard pool or a larger commercial project, we bring the same level of attention to detail and quality workmanship. We’ve successfully installed coping on hundreds of pools throughout the region, and our portfolio speaks to our commitment to excellence. Contact Avatar Scapes today to discuss your pool coping project and see why North Georgia homeowners consistently choose us for their pool finishing needs.
Conclusion
Installing pool coping transforms your pool from good to truly spectacular. Yes, it requires planning, quality materials, and patience, but you have the knowledge to complete this project successfully. The satisfaction of seeing your finished pool with pristine coping edges makes every bit of effort worthwhile. You’re not just creating a finished edge; you’re protecting your pool investment and adding genuine value to your home. Follow these steps carefully based on my years of experience, don’t rush, and you’ll have professional-looking coping that lasts for years to come. Your pool is about to look resort-worthy.


